Sunday 19 March 2023

Simple Red Lentil Dahl Recpe

Dahl is a traditional comforting and delicious vegan Indian dish that is enjoyed as a staple in many Indian and South Asian households.  Today's recipe is a red lentil Dahl, however it Dahl can be made in many variations with a variety of lentils or split peas, including red lentils, yellow lentils and split chickpeas. It can also be made with added veg as I have done, including onions and tomatoes.


Ingredients:

  • Olive oil
  • Rice 
  • 2 white onions (diced) 
  • Roughly 1/2 inch of fresh ginger (grated) (you can use more if you prefer)
  • Fresh garlic cloves (roughly 4-7, finely chopped) 
  • 300g dried red lentils 
  • 800ml veg stock 
  • 1 can of chopped tomatoes 
  • 1/2 can of coconut milk 
  • 1 fresh lime 
  • Packet of fresh coriander (finely chopped)
  • 2 tsp turmeric 
  • 2 tsp ground cumin 
  • 2 tsp garam masala 
  • Salt and pepper 
  • (optional) cardamon pods
  • (optional) chicken masala powder 
  • (optional) dry star aniseed 

Method:

  1. In a pot, fry the diced onions and garlic for around 4-5 minutes before adding all of the spices.  If the onions become very dry from the spices, then add a few drops of water to them.
  2. Pour the 800ml of veg stock onto the onion and spice mixture in the pot.
  3. Wash your lentils before adding them into the pot and stir. 
  4. Cook the lentils in the pot for around 10 minutes stirring occasionally.  They will begin to absorb the water and thicken. 
  5. Add in the chopped tomatoes and coconut milk and stir.
  6. Add in the fresh coriander. 
  7. Leave to simmer for around 15-20 minutes, stirring occasionally. The Dahl should begin to simmer down and thicken.  If if is too thick early on then add some more coconut milk or water to achieve your desired consistency. 
  8. If needed, add some more salt and pepper.  You can also add some lime juice now. 
  9. Add some fresh coriander or aniseed or lime to garnish and enjoy! (Also, don't forget to cook some rice or naan bread for serving too). 


SHARE:

Sunday 12 February 2023

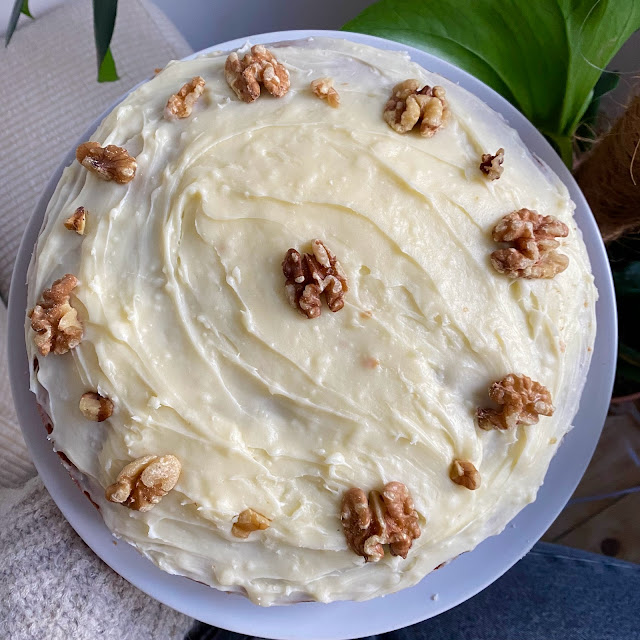
Carrot and walnut cake

Carrot cake is a sweet and moist cake that is a popular dessert in many countries and is often enjoyed as a simple treat with a cup of coffee or tea. There are many variations of this cake, however I wanted to share my staple recipe, which is loved by my friends and family.  The carrot flavour isn't too intense (although you can add more carrots to the mix if you prefer a more intense flavour) and the icing recipe is also below.  The sponge is super moist and delicious. 


I recommend making 2 tiers to make it that extra bit more impressive.  For this you can either use 2 identical 18-20cm cake tins or if you only have 1 tin, then you can bae one layer at a time.  An electric whisk is also preferable (and will make the preparation super quick) but not essential. 

Ingredients 

For the icing: 

  • 100g butter (preferably unsalted)
  • 300g icing sugar 
  • 100g soft/cream cheese 
For the cakes:
  • 270g self-raising flour 
  • 2 tsp cinnamon powder
  • 330g light brown sugar 
  • 1/4 tsp ground nutmeg 
  • 1 tsp vanilla extract 
  • 4 eggs 
  • 100g natural greek yoghurt 
  • 230ml vegetable oil 
  • 3-4 carrots (grated)
  • 1/2 orange skin zested
  • approx 100g walnuts 
  • a pinch of salt

Method

Cakes 
  1. Pre-heat the oven at 180 degrees and line your cake tins with baking paper. 
  2. Combine the flour, sugar, nutmeg and cinnamon in a bowl and mix together with a pinch of salt. 
  3. In a separate bowl, combine the vegetable oil, 4 eggs, yoghurt and orange zest in a bowl and whisk. 
  4. Combine the wet mixture with the dry mixture.
  5. Add in the grated carrots and around 50g or half of the walnuts.
  6. Mix well and spread evenly between the two cake tins.  It is helpful to use a baking scale to ensure each layer will be the same size. 
  7. Bake for around 25 minutes and check it is cooked using a wooden skewer. Once baked, leave in the tins to cool down. 
Icing 
  1. Ensure the butter is softened and beat it together with the icing sugar before adding 50% of the cream cheese.  Once the cheese is added, beat again before adding the rest of the cheese.  
  2. Use half of the icing in the middle of the two cake layers and the other half to cover the top of the cake.  Finish by adding some walnuts for decoration. 


SHARE:

Saturday 11 February 2023

Maori Fry Bread (Paraoa Parai)

Today I'm sharing my recipe for this traditional Maori fry bread, also known as "rewena bread". This is a traditional bread recipe that originates from my ancestors, the native Maori people of Aotearoa (New Zealand). It's a simple bread that has been a staple in Maori cuisine for generations. In addition to its cultural significance, this bread is also a popular street food and is often sold at fairs / festivals / markets in NZ.

These mini bread pieces are crispy on the outside and soft inside. They are delicious on their own of with savory or sweet toppings such as butter, jam, honey or cheese. They can also be used as a base for sandwiches and burgers or as a side to any stew or soup.


My recipe makes around 20-25 pieces 

Ingredients 

  • 3/4 cup of boiling Water
  • 1 cup chilled Milk (ideally dairy milk but can be substituted) 
  • 1 tbsp dried active yeast
  • 1 tbsp sugar
  • 4 tbsp oil (ideally vegetable oil but can be substituted for other frying oils) 
  • 1½ tsp salt
  • 4-4 ½ cups of flour (ideally white flour but can use gluten free)
  • More oil for frying

Method 

  1. Combine the boiling water and chilled milk in a large bowl. 
  2. Test temperature with finger to make sure it's not too hot (will kill yeast), or too cold (yeast won't activate).
  3. If okay, add sugar, oil, and yeast, and stir.  Set aside somewhere warm for around 20 minutes until the mixture bubbles.
  4. Once bubbled, add 4 cups of flour and the salt and fold together gently, being careful not to overmix. Add more flour if it's still too sticky.
  5. Gently knead together for 15 seconds into a ball, then leave in bowl, covered with a tea towel.  Leave to proof somewhere warm for around 1 hour until the ball doubles in size.
  6. Remove the risen dough ball from the bowl onto a lightly floured bench (see photo below). 
  7. Gently shape the dough into a rectangle, around 2cm thick before cutting into roughly 6cmx6cm squares. This should make around 24 pieces.
  8. Spread the small pieces out onto a floured surface and cover them with a tea towel and leave to proof for another 15 minutes.
  9. In the meantime, fill a medium size pot with oil to around 20cm height and 170°C. To check the oil is hot, place the end of a wooden spoon in the oil, if the oil bubbles then it is hot enough.  Make sure the oil isn't too hot however, as the inside of the bread pieces won't cook.
  10. Cook the pieces in batches.  Once a batch is cooked, drain them on a paper towel and let them rest for 5 minutes before serving.


SHARE:

Juicy fried fish tacos with salsa and pickled red onions

Fish tacos are packed full of fresh and flavourful ingredients.  They are one of my favourite dishes to order at a Mexican restaurant and so I thought I would finally have a go at making them myself. I always assumed they would be extremely complex because of the various flavours and components, however this recipe was straightforward and extremely fresh, filling and delicious. 


Ingredients 
For the pico de gallo salsa:
  • 4 large tomatoes (chopped up as small as possible)
  • 1 small red onion  (also chopped up as small as possible) 
  • a handful of fresh coriander, or as much as you would like (chopped)
  • fresh lime juice 
For the pickled onions:
  • 1 red onion (chopped into thin strips)
  • fresh lime juice 
  • 1 tbsp sea salt 
  • fresh chilli or chilli flakes 
  • 1/4 tsp dried oregano 
For the fish:
  • Approx 150g cod fillet, cut into 3-4cm strips 
  • 140g plain flour 
  • 1tsp baking powder
  • 1/2 tsp dried oregano 
  • 1/2 tsp black pepper 
  • 1 tsp garlic salt 
  • 1 egg
  • 1tsp mustard 

Extras:
  • 1 litre vegetable oil (for frying)
  • a packet of small tortillas 
  • iceberg lettuce (finely chopped for serving)
  • lime wedges 

Method

Pico de Gallo salsa - finely chop the tomatoes, onion and coriander and toss in a bowl with the lime juice and salt.

Pickled onions - chop the onions into strips and cover in salt. Leave to sit for 10 minutes or as long as possible before rinsing and draining the onion.  Cover in lime juice, oregano, and a pinch of salt and chilli. 

Fried fish - for the batter, mix together the flour, baking powder, garlic salt, oregano and black pepper before adding 180ml of water, together with the egg and mustard. Keep mixing until all of the ingredients are combined and the batter is thick.

Dry your fish with some kitchen paper and coat in a tiny bit of flour to ensure that the batter will stick.  

Coat all of the pieces of fish in the batter.

Pour oil into a pot up to around 15cm high and wait for it to heat up.  Once heated, add batches of your fish to the oil and deep fry for around 3-4 minutes until golden.  Ensure that you do not add too many pieces at once of they will stick together. 

Warn your tortillas on a pan or in the microwave before covering in mayo and adding your fish, salsa, onions and some more lime juice. 


SHARE:

Monday 18 April 2022

Mini Egg Cookies

Cookies are the perfect treat for everyone of all ages and during all occasions.  I have wanted about learning to bake the perfect large cookies for months, just like those that you find in supermarket bakeries. I thought what a more perfect time to learn than Easter weekend.  These were delicious and turned out exactly how I'd hoped so I thought I would share the recipe. 


Ingredients 

  • 160g unsalted butter (if using salted butter then don't add additional salt)
  • 100g soft brown sugar
  • 75g white sugar 
  • 1+1/2 tsp baking power 
  • 1/2 tsp bicarbonate of soda 
  • 1 egg 1/2 tsp salt 
  • 300g plain flour
  • 100g chopped up dairy milk chocolate bar 
  • Around 250g mini eggs (200g chopped, 50g whole)
  • Vanilla extract (optional)

Method 

  1. Cream together the butter (softened) and both the brown and white sugar in a bowl before adding in the egg and vanilla extract.
  2. Sieve in the flour, bicarbonate of soda, baking powder and salt to the wet mixture and beat until a dough is formed.
  3. Add in the mini eggs and dairy milk chocolate pieces and mix to make sure they are evenly spread throughout the dough/mixture. 
  4. Separate the dough into 115g pieces and roll them into balls with using your hands. 
  5. Place the balls on a tray and put them in the freezer for 30-60 minutes. 
  6. Once chilled, pre-head the oven and place the balls onto a tray covered with baking / greaseproof paper. Bake in the oven at 180 degrees for around 12-15 minutes. It is best to do 4 cookies per tray so they don't stick together. 
  7. Once baked you can either eat them warm and soft or leave them to cool down and become crispier. 
SHARE:

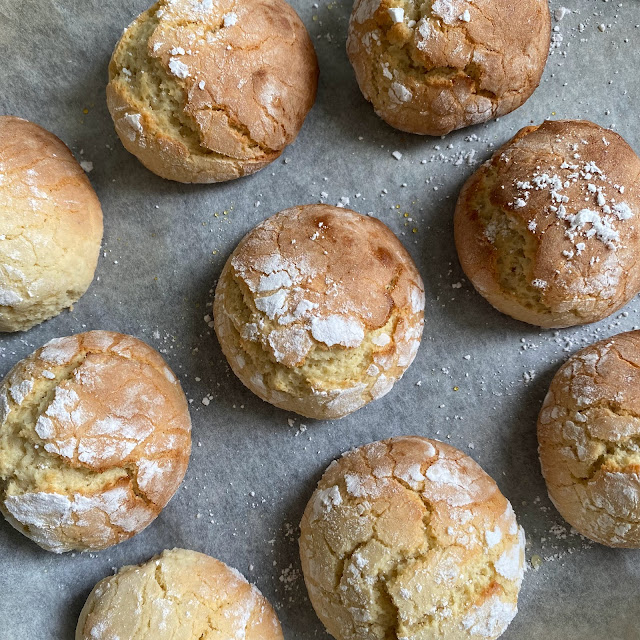
Lemon and almond cookies

Here is the recipe for my mini lemon and almond cookies.  These are light, little round biscuits - perfect as snacks or to offer to guests with some tea or coffee. 


Ingredients 
  • 1/2 cup of white sugar
  • 1/4 cup of melted coconut oil
  • 1 + 1/2 cup of plain flour
  • 1 tsp baking powder
  • 1/8 tsp salt
  • 1 egg
  • 4 tbs lemon juice (preferably fresh)
  • 1 egg yolk 
  • 1/3 cup sliced almonds
  • 1/4 cup icing sugar 
  • 1/2 tsp almond extract (optional)
Method 
  1. Cream together the sugar, coconut oil, egg and egg yolk and lemon juice. 
  2. Mix in flour, salt, baking powder and almonds into the wet mixture and form a ball.
  3. Cover the bowl with the ball of dough and place in the freezer for 20 minutes. 
  4. Use your hands to warm chunks of the dough and form it into cookie dough balls.
  5. Dip the cookie dough balls into sieved icing sugar and then place on an oven tray lined with baking / grease proof paper. 
  6. Bake for around 12-15 minutes. 
  7. Mix together some lemon juice and icing sugar and drizzle over the top once finished baking. For a thicker consistency, keep adding more icing sugar. 

SHARE:

Saturday 12 February 2022

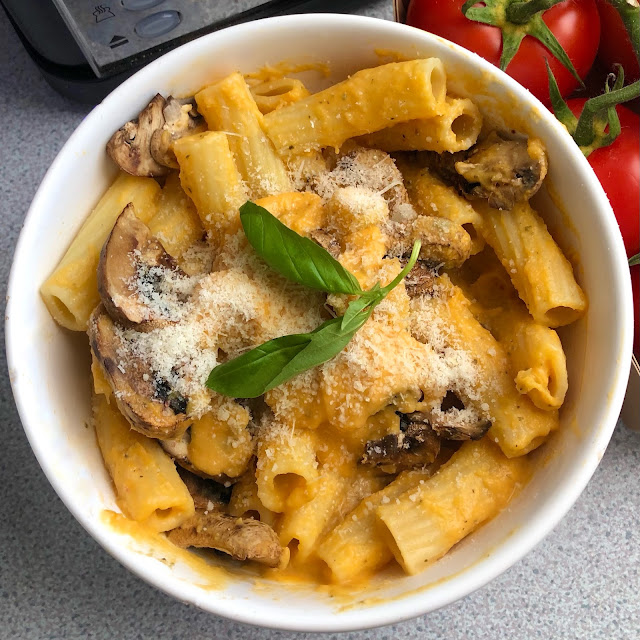
Butternut squash and roasted garlic pasta sauce

This recipe creates a simple and healthy pasta sauce.  This recipe can also be used to make soup by simply adding more cream or water whilst blending. 


Ingredients:
  • 1 butternut squash (diced) 
  • 1 white onion (chopped in half) 
  • Handful of fresh garlic cloves 
  • Single cream
  • Fresh rosemary 
  • Salt and pepper 
  • Olive oil 
Method 
  1. Roast the diced butternut and onion on a baking tray after drizzling in olive oil.  Roast together with the fresh garlic and rosemary for around 25 minutes.  If you like you can also roast some chopped mushrooms as they go so well with this dish. 
  2. In the meantime boil some pasta. 
  3. Once the veggies have roasted, let them cool slightly before adding the onion, butternut, garlic and rosemary to a blender. 
  4. Once blended, add in some single cream, some pasta water and some more salt to taste and blend again.  It is up to you what consistency you like.  If I am just having this as a soup I'll add more cream and for a sauce I'll add less and keep it thick 
  5. Finally, mix the sauce with the pasta add your roasted mushrooms, parmesan and basil. 

SHARE:

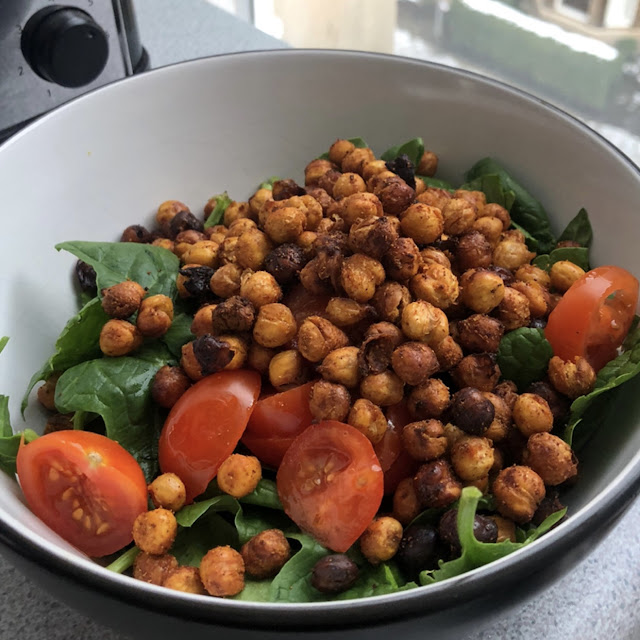
Roasted chickpea salad

This recipe is a very simple go-to salad recipe that can be enjoyed as a meal or as a side dish.  It can also be adapted with whatever salad veggies you like.

To create this salad simply roast a can of chickpeas (preferably on parchment paper so that they don't stick) for roughly 30 minutes until crunchy, shaking them half way through.  

Before roasting them, cover them in the following:

  • A tiny bit of olive oil
  • Garlic granules
  • Onion salt
  • Smoked paprika 
  • Salt and pepper  
  • Chilli flakes 
  • Powdered cumin
These chickpeas will go with almost any salad of your choice.  I kept mine quite simple and went for lettuce, cucumber, tomatoes, onion and avocado.  You can also add a squeeze of lemon over the top. 

SHARE:

Sunday 23 January 2022

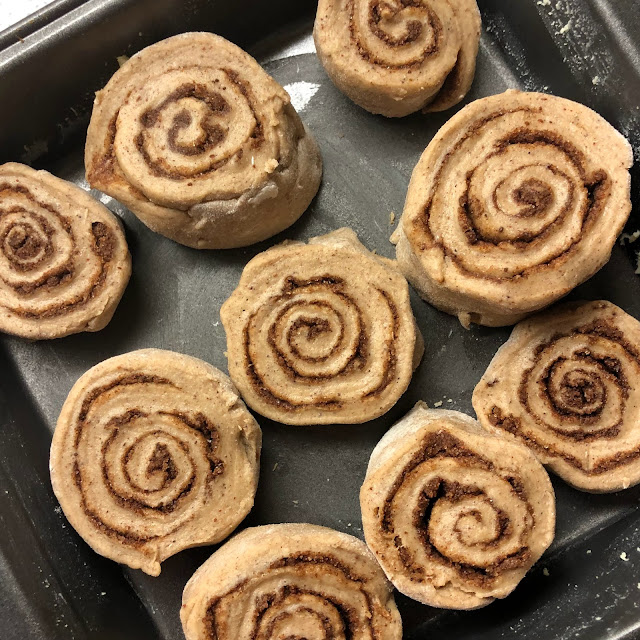
Cinnamon roll recipe

Supposedly cinnamon rolls are a winter treat, however I love to enjoy them all year round and so I couldn't wait to learn to make them myself.  There are so many different ways of making these so feel free to amend my recipe however you like or let me know if you have any tips.  


Ingredients
  • 300g self raising flower 
  • 70g butter (preferably unsalted)
  • 2 egg yolks 
  • 130ml full fat milk 
  • 1 tsp baking powder 
  • 1 tsp cinnamon powder
  • 2 tbs caster sugar 
Filling: 
  • 30g melted butter 
  • 50g brown sugar 
  • 2 tbs caster sugar 
  • 1 tsp cinnamon powder
Icing:
  • 60g icing sugar 
  • 1 tbs soft/cream cheese 
  • 1 tbs butter (also preferably unsalted)
  • 1/2 vanilla extract (optional) 
  • (you can also simply mix icing sugar with a few drops of water for a thinner icing)
Method:
  1. Mix the dry ingredients (flour, cinnamon and sugar) together in a large bowl. 
  2. In a separate bowl, mix or whisk together the egg yolks and the butter and then add into the dry flour mixture to create a dough.  If you are using yeast instead of self raising flour then leave the dough to sit for at least 30 minutes. 
  3. Sprinkle flour over a dry surface, place the dough on the surface and roll it out into a rectangle shape. 
  4. In a separate bowl again, mix together all of the ingredients for the filling and spread the sugary paste evenly over the top of the rolled out dough. 
  5. Once covered, roll up the dough into a long Swiss roll and use a piece of thread or floss to cut into even slices.  You can do this by placing the edge of the roll onto the string and pulling the string in opposite directions over the top.  This creates a clean cut and prevents the dough from being flattened by being pushed down on with a knife. 
  6.  Cover a cake or brownie tin in butter and place the rolls inside. 
  7. Bake for around 25-30 minutes at 180 degrees. 
  8. Whilst the rolls are baking, prepare the icing by combining all of the icing ingredients, sifting in the icing sugar and adding drops of hot water until it reaches the desired consistency.  Drizzle over the rolls once they have have finished baking. 

SHARE:

Tuesday 23 February 2021

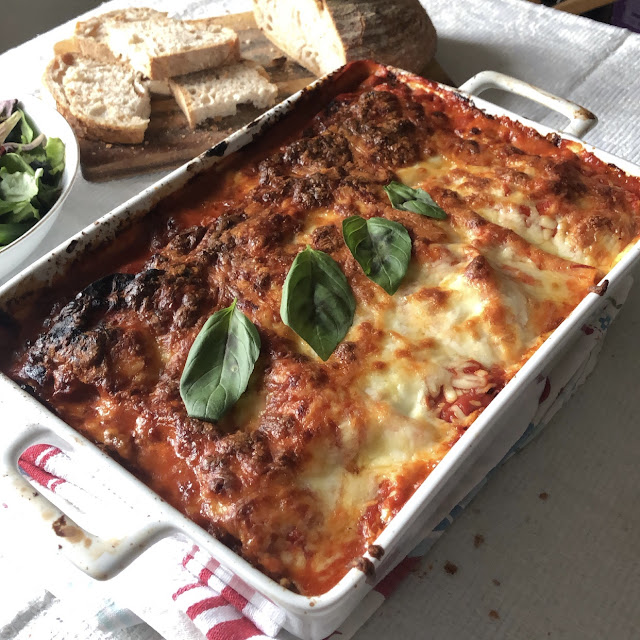
Simple Veggie or Vegan Lasagna Recipe

Lasagna is a traditional Italian dish made of layers of flat pasta sheets, a tomato based sauce, various types of cheese, and in this case vegetables. Today I wanted to share my recipe for this delicious veggie lasagna.  It's simple to make and can serve a whole family.  Cheese is a key ingredient in lasagna, however this recipe can also be adapted for vegans bt simply replacing the cheese with vegan cheese. 


Ingredients:

  • A packet/box of dry pasta sheets 
  • 2 large aubergines (or 3 smaller ones) 
  • 2-3 cans of chopped tomatoes and/or a passata
  • 1 large white onion 
  • Mozzarella (and any other cheese of your choice - I like grated cheddar for the top layer)
  • Red pepper (optional)  
  • Garlic cloves & olive oil
  • Salt, pepper & smoked paprika

Method
  1. Chop the aubergines into circles around 1cm thick and then dice the onion and red pepper onto small pieces. 
  2. Place all of the chopped vegetables on a baking tray, cover with salt, pepper and olive oil and cook for around 20 minutes. 
  3. Whilst the vegetables are in the oven, add some olive oil and fresh garlic to a pan and then add the chopped tomatoes or passata and let it simmer for around 15 minutes, adding salt, pepper and some water if needed. 
  4. Once the vegetables are ready, layer them in a deep oven dish with the pasta sheets, sauce and cheese. I like to put some veggies first, then some lasagna sheets and then the sauce before adding some cheese. It is important to make sure that the sheets are property covered in sauce so that they soften and cook through properly. 
  5. Once you have finished layering, add some more cheese on top and bake in the oven for around 30-40 minutes.

SHARE:

Monday 1 February 2021

AUTHENTIC AISAN CURRY RECIPE

Today I wanted to share this authentic family recipe. This is great if you want an authentic (and healthier) curry without having to order a takeaway.  The level of spiciness can be amended to taste and this is also a great option if you like to meal-prep in advance as it still tastes amazing after having been kept in the fridge for a couple of days. 


Ingredients 

  • 500g chicken breast (also works with thighs if you prefer)
  • Olive oil 
  • 1 large white onion 
  • Turmeric
  • Cumin seeds
  • Salt & pepper
  • Garam and/or chicken masala 
  • Cardamon pods (optional) 
  • Garlic and ginger paste (or fresh garlic and ginger)
  • 1 can of chopped tomatoes 
  • Chillis or chilli flakes 
  • Fresh coriander
  • Rice   


Method

  1. Heat up the olive oil and fry the copped onion until golden.
  2. Add the turmeric (3/4 tsps), cumin seeds(1/2 tsps), salt (3/4 tsps) and garlic and ginger paste (1 tsp).
  3. Mix for like 3 mins until you can smell the aromas from the spices (add some water if it starts to stick)
  4. Add the can of copped tomatoes.
  5. Wait for around 3 minutes and add the chopped chicken breast on a high heat. 
  6. Sprinkle on the garam masala (3/4 tsps) and continue to cook for around 15 minutes. 
  7. Add fresh chopped green chilies or flakes to taste and fresh chopped coriander.
  8. Cover on low heat for 10/15 mins and stir every 5 mins
  9. Then add some more coriander for garnish 
(If you want a thicker curry, turn up heat and mix for a couple of minutes until it reaches the desired consistency).


SHARE:
© EMMA RENATA. All rights reserved.
Blogger Templates by pipdig